In our fast-paced, AI-driven world, businesses of all sizes are looking for ways to seamlessly integrate advanced technologies like large language models (LLMs) (opens new window) into their daily operations. The potential benefits are enormous—whether it's enhancing customer service, automating routine tasks, or offering personalized experiences.
However, the journey from concept to implementation is often challenging, especially for those without a deep technical background. Traditional methods require significant programming knowledge, which can be a barrier for many.
This is where Dify.AI (opens new window) comes into play. Dify is a user-friendly platform that simplifies the integration of LLMs into business operations, making it accessible even for non-technical users.
In this blog, we’ll take you through the steps to develop a Retrieval Augmented Generation(RAG) (opens new window) application using Dify and MyScale, showing you just how simple it can be.
# What is Dify
Dify.AI (opens new window) is an open-source platform that makes it easier for everyone to use LLMs, whether you're a developer or not. With a simple, user-friendly interface, Dify allows you to build, deploy, and manage AI-powered applications and chatbots without needing much coding knowledge.
What makes Dify stand out is its wide support for different LLMs, letting you choose the one that fits your needs best. It’s packed with features like a Retrieval-Augmented Generation (RAG) engine, workflow automation, observability tools, and enterprise-level security, making it a strong option for businesses of all sizes.
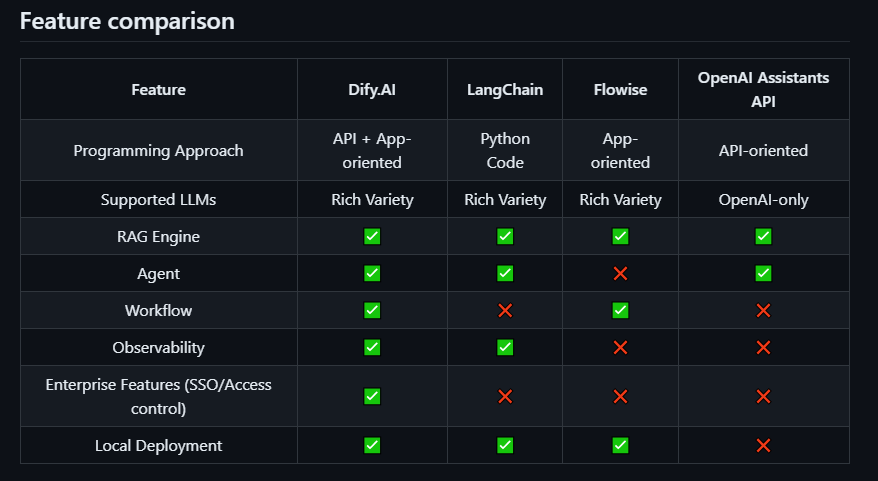
The comparison image below shows how Dify compares to other popular platforms like LangChain (opens new window), Flowise (opens new window), and OpenAI (opens new window) Assistants API:
Dify offers two versions: a web-based cloud platform that anyone can access without setup, and a locally deployable version for users who prefer self-hosting in their environment.
The self-hosting version of Dify allows users to deploy the platform in their environment, giving them full control over data and security. This version is ideal for businesses or developers who prefer to manage their AI applications on their infrastructure.
In this blog, we'll use Dify's self-hosting version to build our RAG application.
# Download the Dify
To begin setting up your RAG application, you'll first need to download the Dify platform. This can be done by cloning the repository from GitHub (opens new window). Use the command below to clone the repository to your local environment:
git clone https://github.com/langgenius/dify.git
This will provide you with all the necessary files and configurations to start working with Dify on your machine.
# Select the right vector database
The effectiveness of a RAG application largely depends on how efficiently and accurately it retrieves documents in response to user queries. By default, Dify is configured to use weaviate as its vector database, which is a reliable choice for managing and querying large datasets.
However, for this blog, we'll take it a step further by integrating MyScaleDB (opens new window), an advanced SQL-based vector database. MyScaleDB has demonstrated superior performance in terms of both speed and accuracy, outperforming other vector databases in various benchmarks (opens new window). By using MyScaleDB, we can ensure that our RAG application retrieves data with the highest precision, optimizing the overall user experience.
# How to Use MyScaleDB in Dify
Dify supports both the open-source MyScaleDB (opens new window) and the enterprise-level MyScale Cloud (opens new window). If you prefer the open-source version of MyScaleDB, you can skip this section.
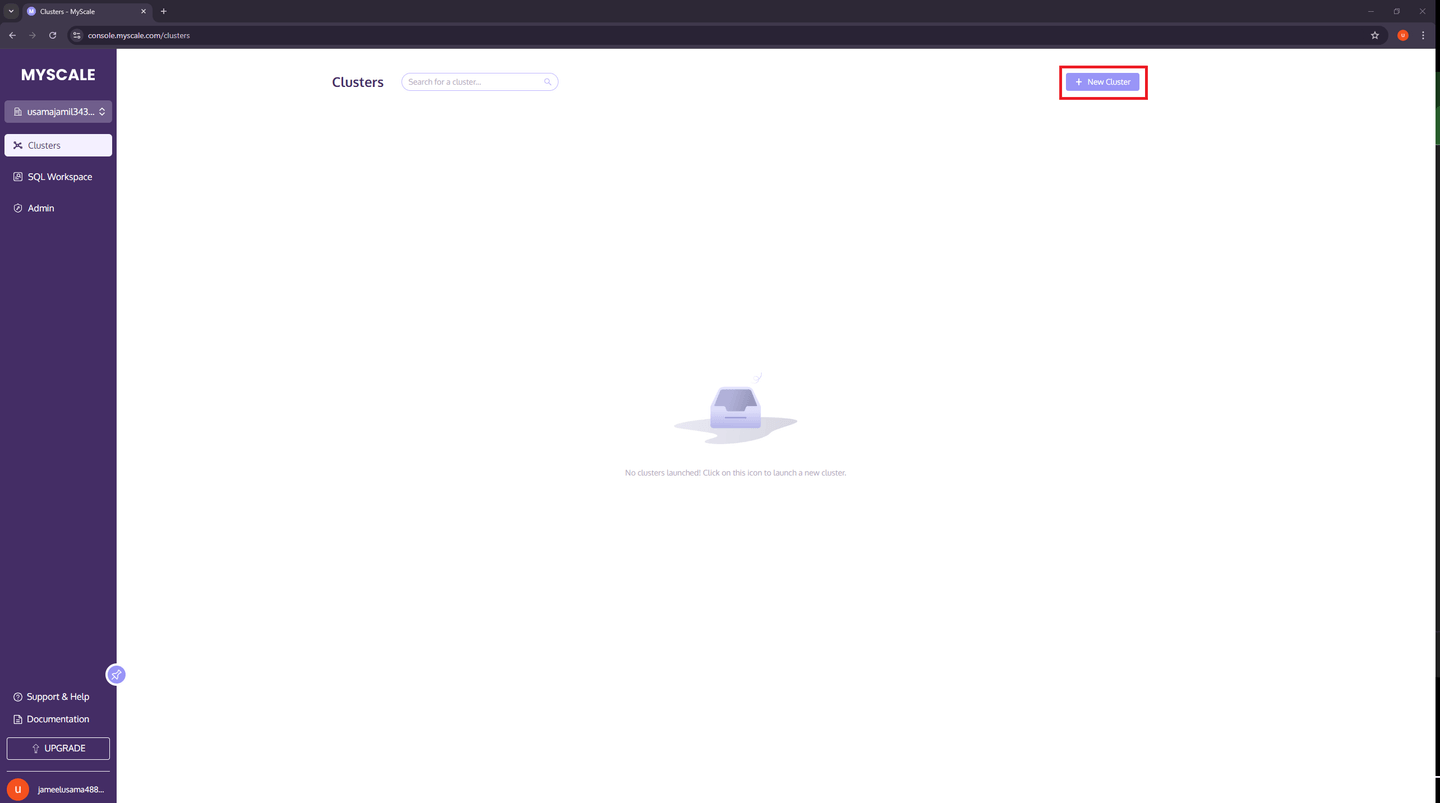
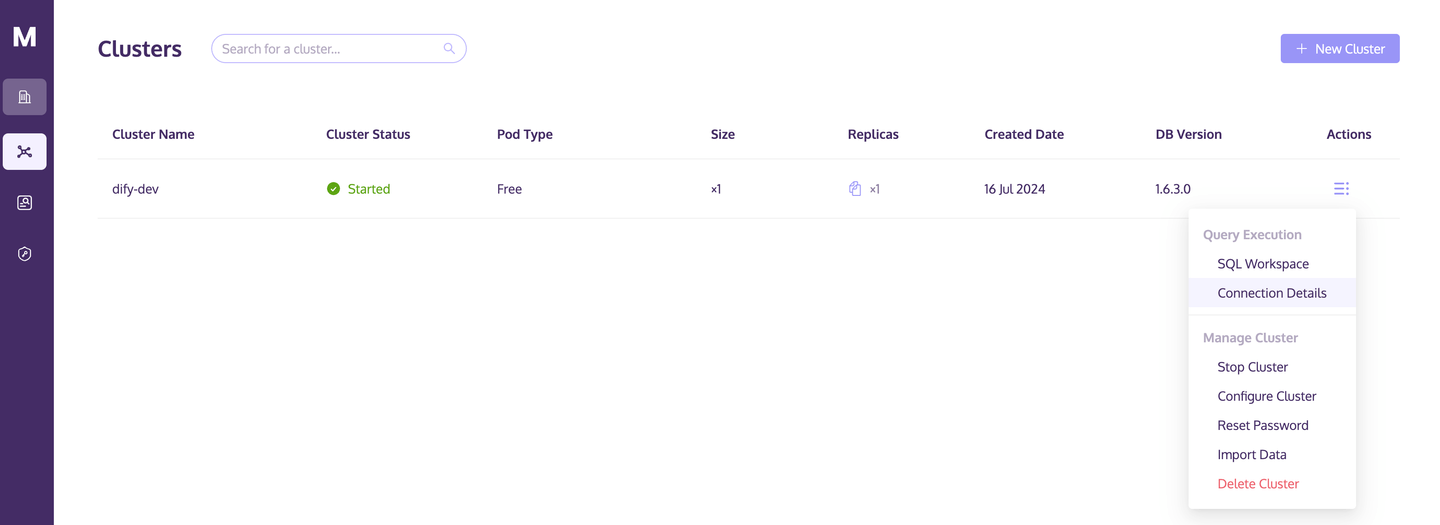
To get started with MyScale Cloud, visit the MyScaleDB signup page (opens new window) and create a new account. Once your account is set up, go to the Clusters page and click the "+ New Cluster" button in the top right corner to create a new cluster.
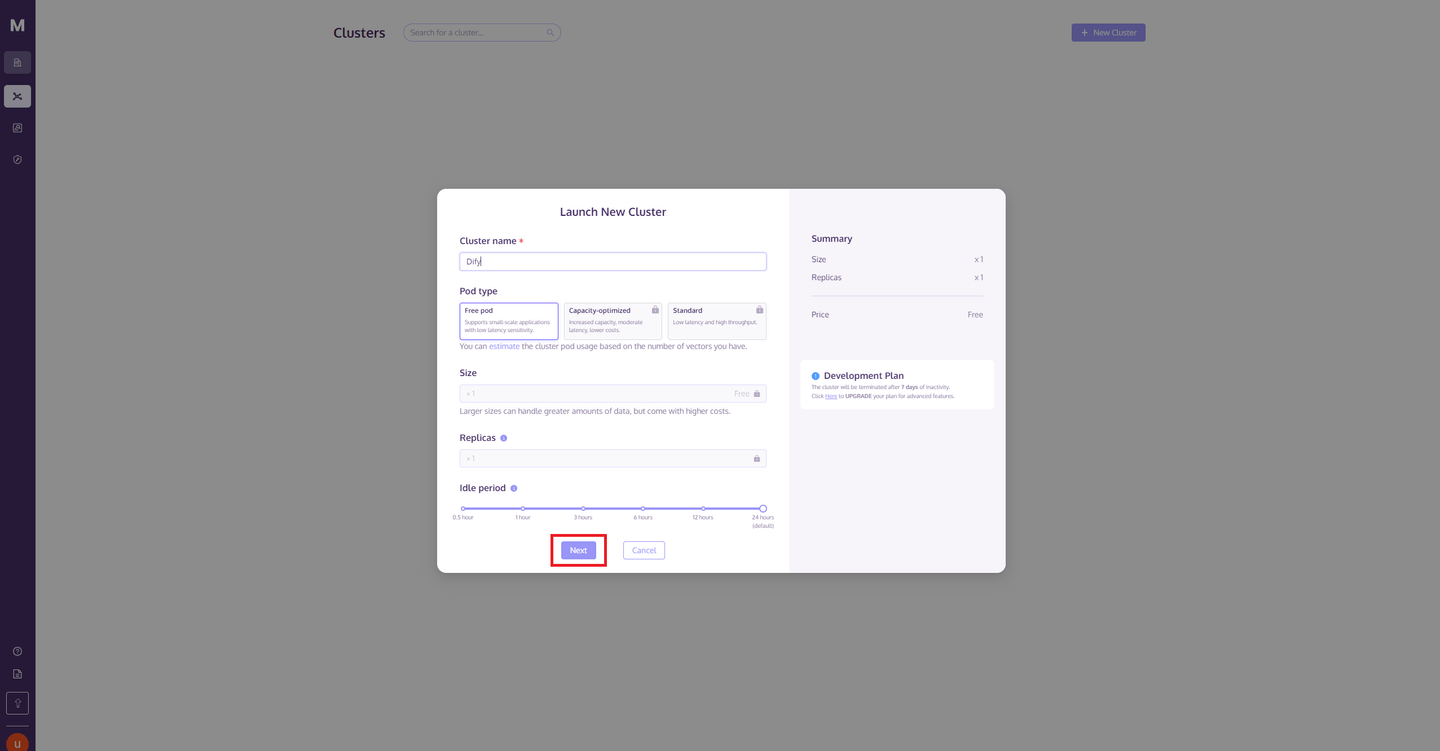
After that, enter the Cluster name, click the "Next" button, and wait for the cluster to finish starting up.
Click the "Actions" button on the right side of the cluster. Then select "Connection Details" from the pop-up list.
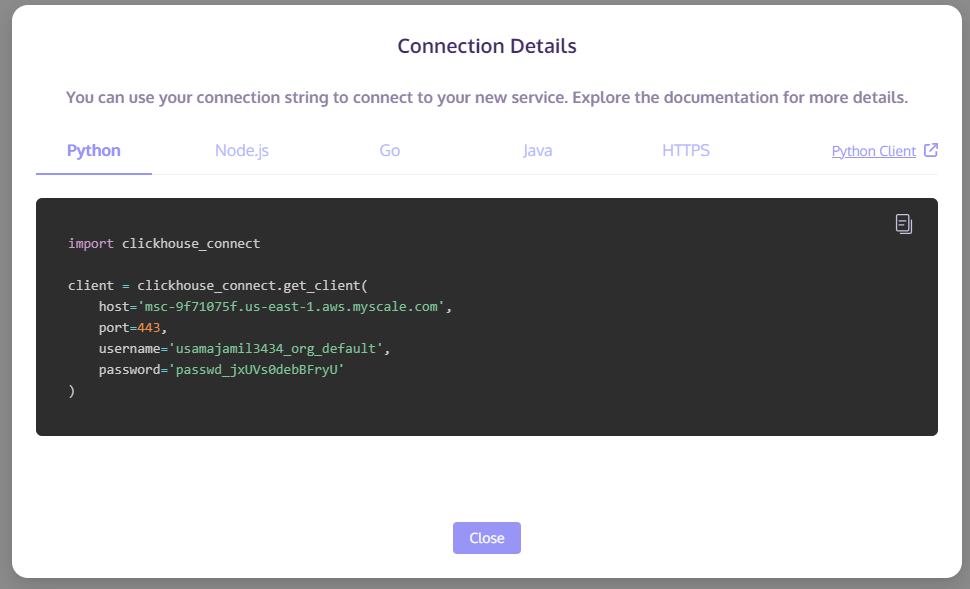
Record the host/port/username/password information from the "Python" tab. This information will be used to configure Dify's access to the MyScale Cluster.
# Integrate MyScale with Dify
To integrate MyScale with Dify, begin by creating a copy of the sample .env file. To do that, enter the following commands in your terminal.
cd docker
cp .env.example .env
This will generate a new .env file in your Docker repository. The next step is to put the details obtained from your MyScale cluster into this file.
For that, open the .env file and follow the following steps:
- Set
VECTOR_STOREtoMyScale
VECTOR_STORE=MyScale
- If you are using MyScale Cloud, adjust the relevant configurations (you can leave
MyScale_DATABASEunchanged) based on the details obtained from the MyScale Cloud web page. If you are using the open-source MyScaleDB, no changes are needed for the following configurations:
MYSCALE_HOST=your-hostname-here
MYSCALE_PORT=8443
MYSCALE_USER=your-username-here
MYSCALE_PASSWORD=your-password-here
MYSCALE_DATABASE=default
MySCALE_FTS_PARAMS=
MyScaleDB offers powerful full-text search features, making it easy to search through large text datasets. The MySCALE_FTS_PARAMS variable allows you to configure these search parameters, such as setting up tokenization and adjusting case sensitivity, ensuring your searches are well-optimized for your specific needs
In this blog, we’ll keep it simple by using the default tokenizer. To do this, you can simply add the following line to your .env file:
MySCALE_FTS_PARAMS='{"text":{"tokenizer":{"type":"default"}}}'
Note: If you need to support multiple languages, such as Chinese documents, please refer to the MyScale official documentation (opens new window) to configure the MyScale_FTS_PARAMS parameter.
- After making these modifications, start Dify as follows:
docker compose up -d
Note: Before entering the above command, ensure that Docker is installed and running on your system. If Docker is not installed, you can download and install it from the official Docker website (opens new window).
The command above will start the required services (Docker Compose will bring up the necessary applications). Once all services are in the "started" state, open your browser and navigate to http://localhost (opens new window) to start using Dify. You will see a login page like this:
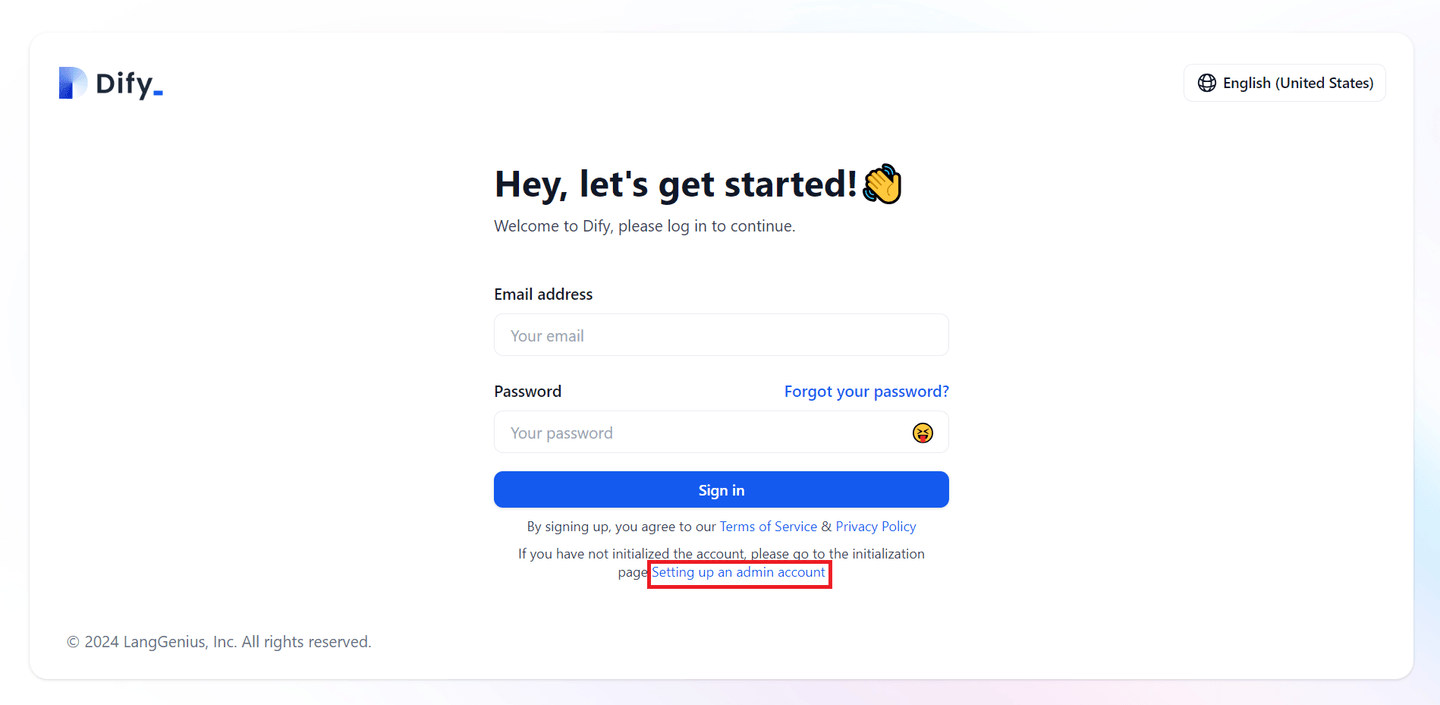
The next step is to set up an admin account and sign in to Dify. Once logged in, you'll be directed to the homepage.
At this point, our Dify platform and MyScaleDB are up and running smoothly. Now, we can move on to the actual implementation of the chatbot.
# Build a Chatbot with MyScale and Dify
# Step 1: Set Up the Knowledge Base
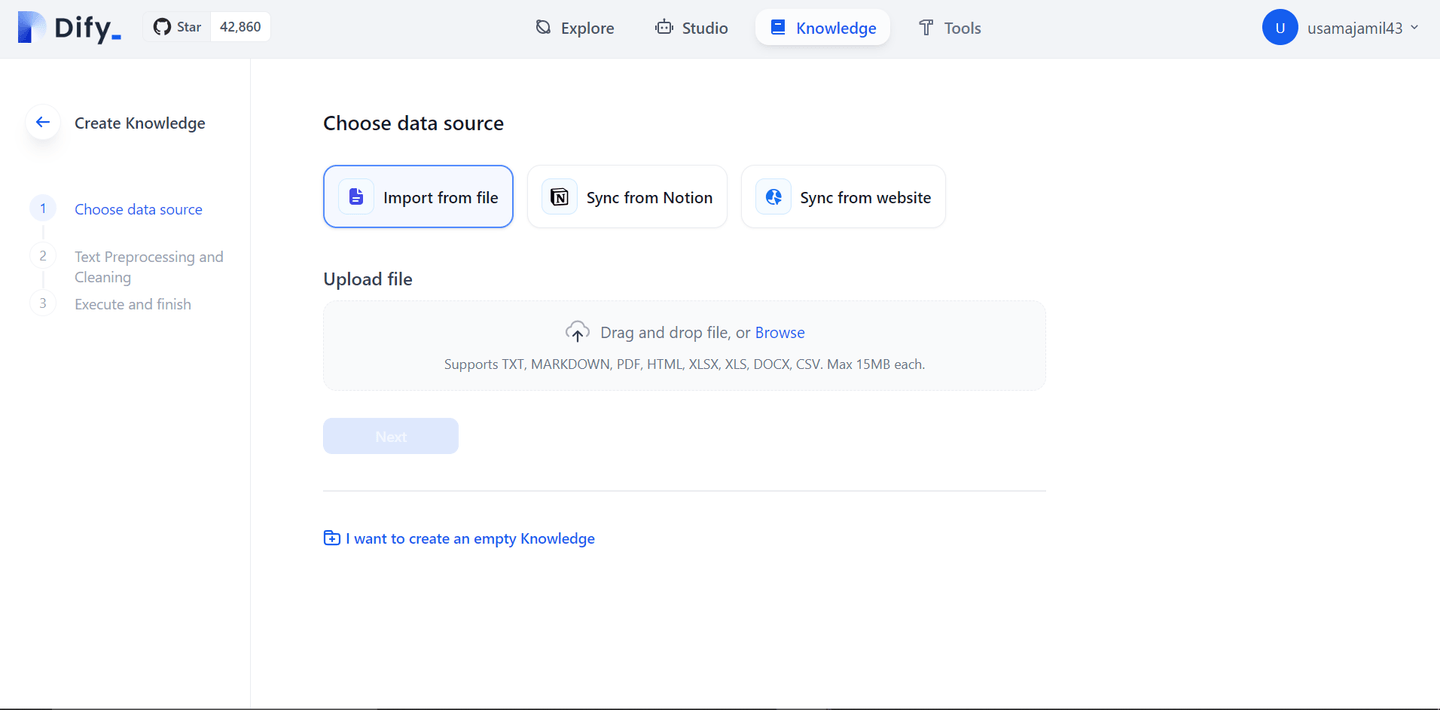
Now that everything is set up, we’re ready to start building the chatbot. The first thing we need is a knowledge base that our chatbot will use to answer user queries. To begin, click on the "Knowledge" button and upload the file you want to use as the knowledge base.
Dify allows you to incorporate data from various sources, such as syncing with Notion or a website.
Note: For our knowledge base, we’ve combined content from two articles MyScaleDB Vs Zilliz (opens new window) and MyScale Vs Pinecone (opens new window).
# Step 2: Customize Knowledge Base Options
After uploading your file, you'll have access to several customization options, including adjusting the chunk size, selecting the embedding model, and choosing the type of search you want to implement.
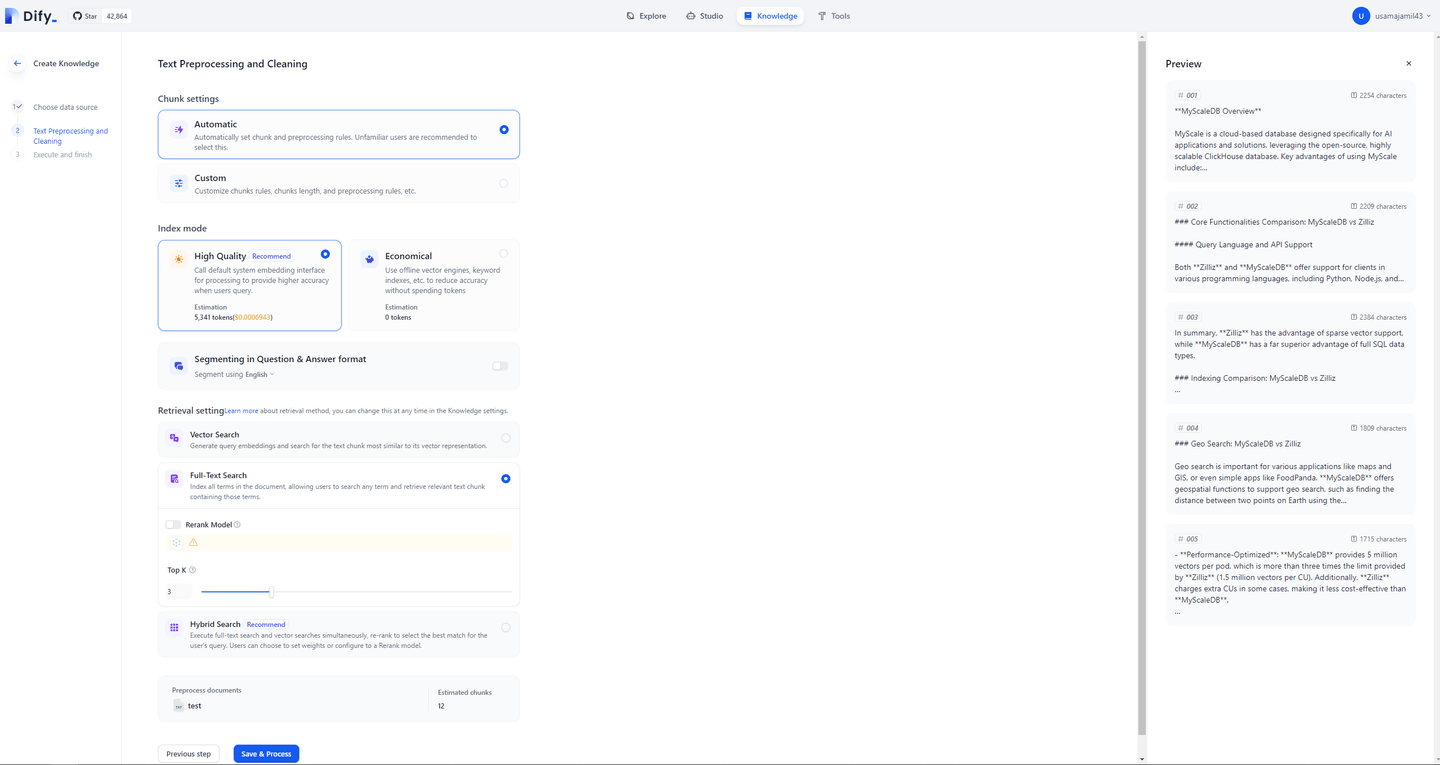
For the retrieval method, we'll select the full-text search option to keep our search queries streamlined and efficient for textual data.
Note: For "High Quality" embeddings, we are using OpenAI's embedding models (opens new window). To set up the OpenAI key (opens new window) in your environment, click on your profile in the top right corner, go to settings, and configure the key for the platform you want to use.
Click the "Save and Process" button, and the system will take a few seconds to generate the embeddings and store the data in your knowledge base (MyScaleDB). Once the data is saved, your knowledge base is fully set up.
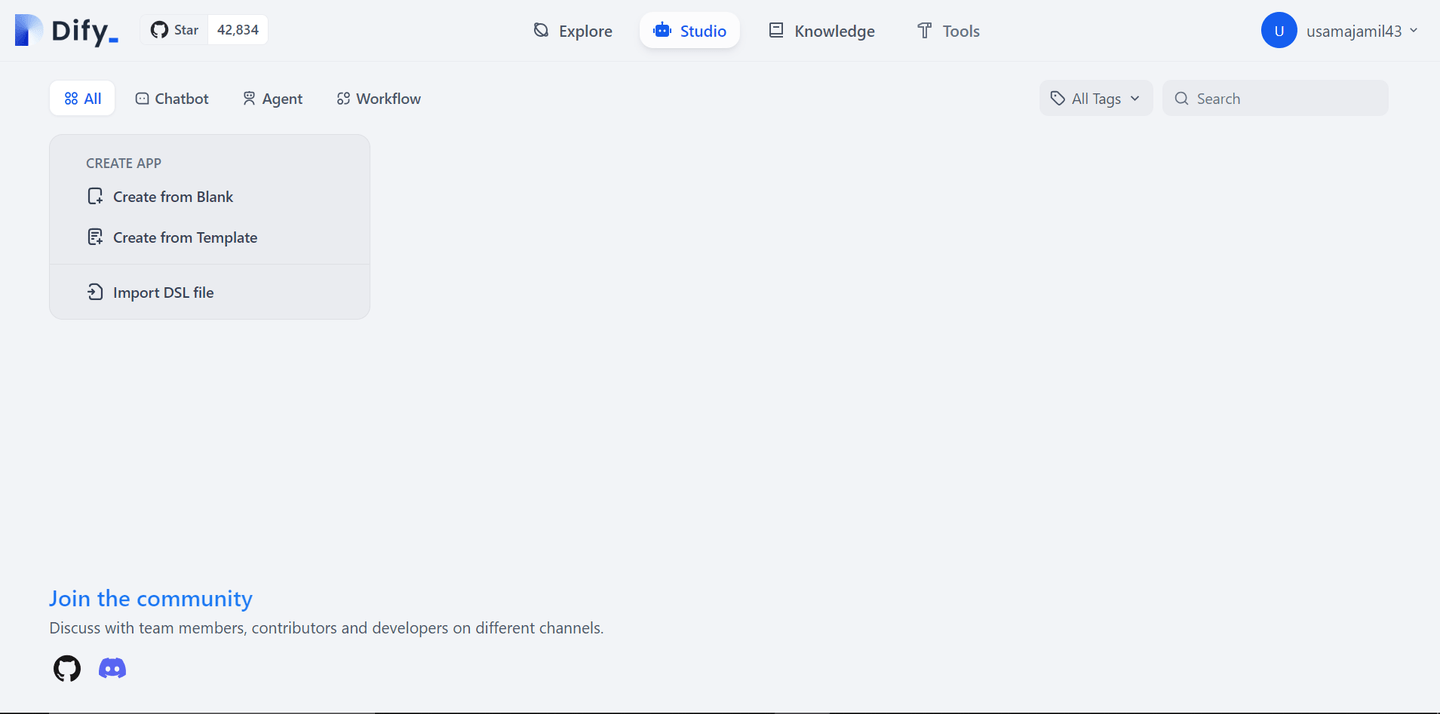
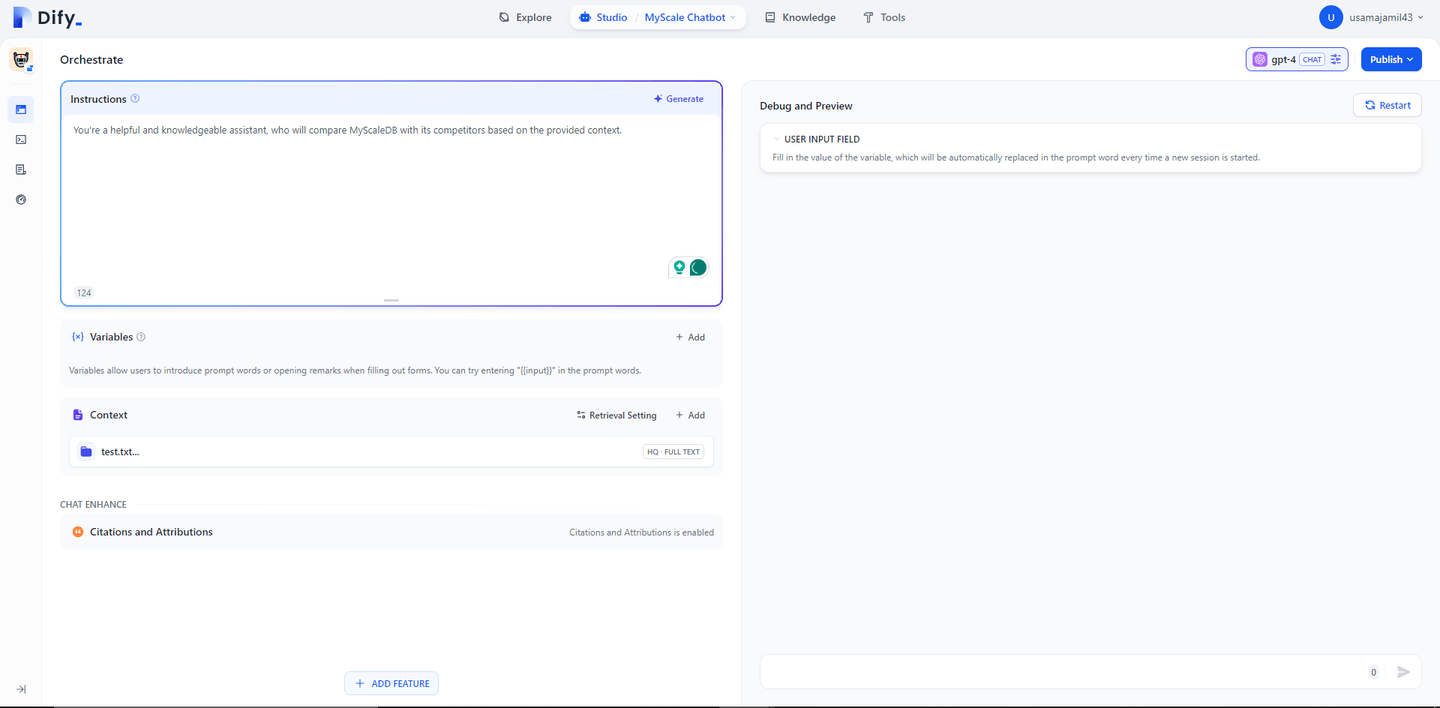
# Step 3: Create and Configure the Chatbot
Now we are ready to select the chatbot template from the Studio and integrate the knowledge base with it. In the Studio, select "Chatbot", and then click on "Create from Blank" under the Create APP menu. A pop-up window will appear, guiding you through the next steps.
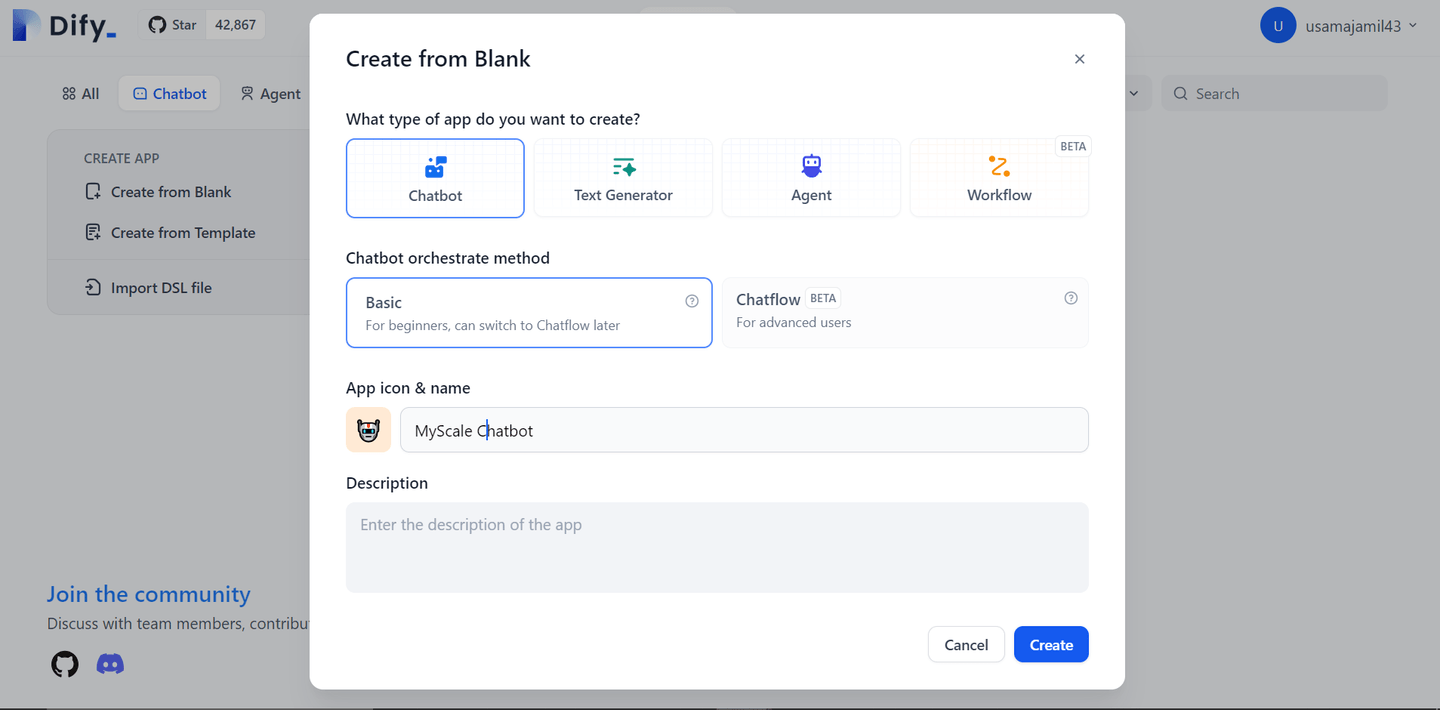
Upon clicking the "Create" button, you'll be taken to a new window where you can write your prompt and add the knowledge base you created as context.
# Step 4: Add Knowledge Base to Chatbot
In the "Context" window, when you click the “+Add” button, you’ll see a list of all the files you've added to your knowledge base. Just select the one you want your chatbot to use and hit the "Add" button. This way, your chatbot will have the right context to provide accurate responses.
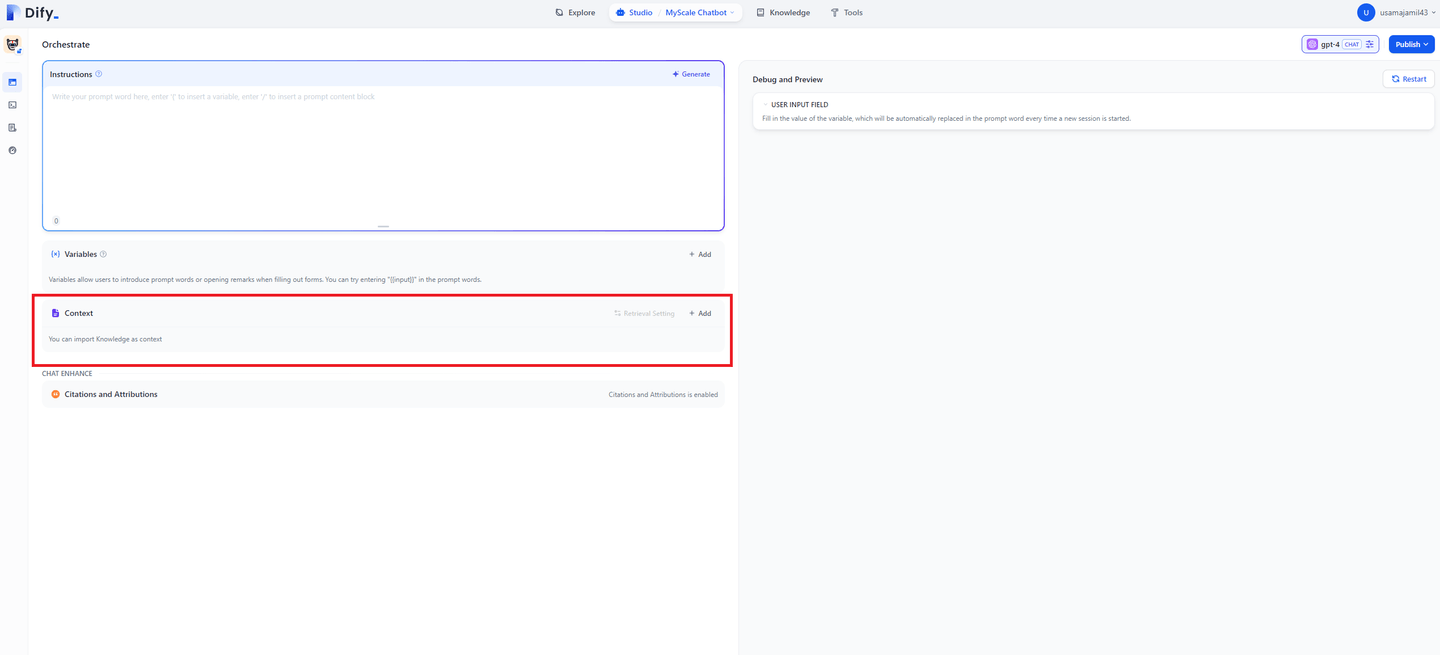
In the same way, you can provide specific instructions to your chatbot within the instructions box.
# Step 5: Publish and Deploy Your Chatbot
Our chatbot is all set and ready to go! The final step is to publish it. Just click the Publish button in the top right corner, and you’ll see a menu like this:
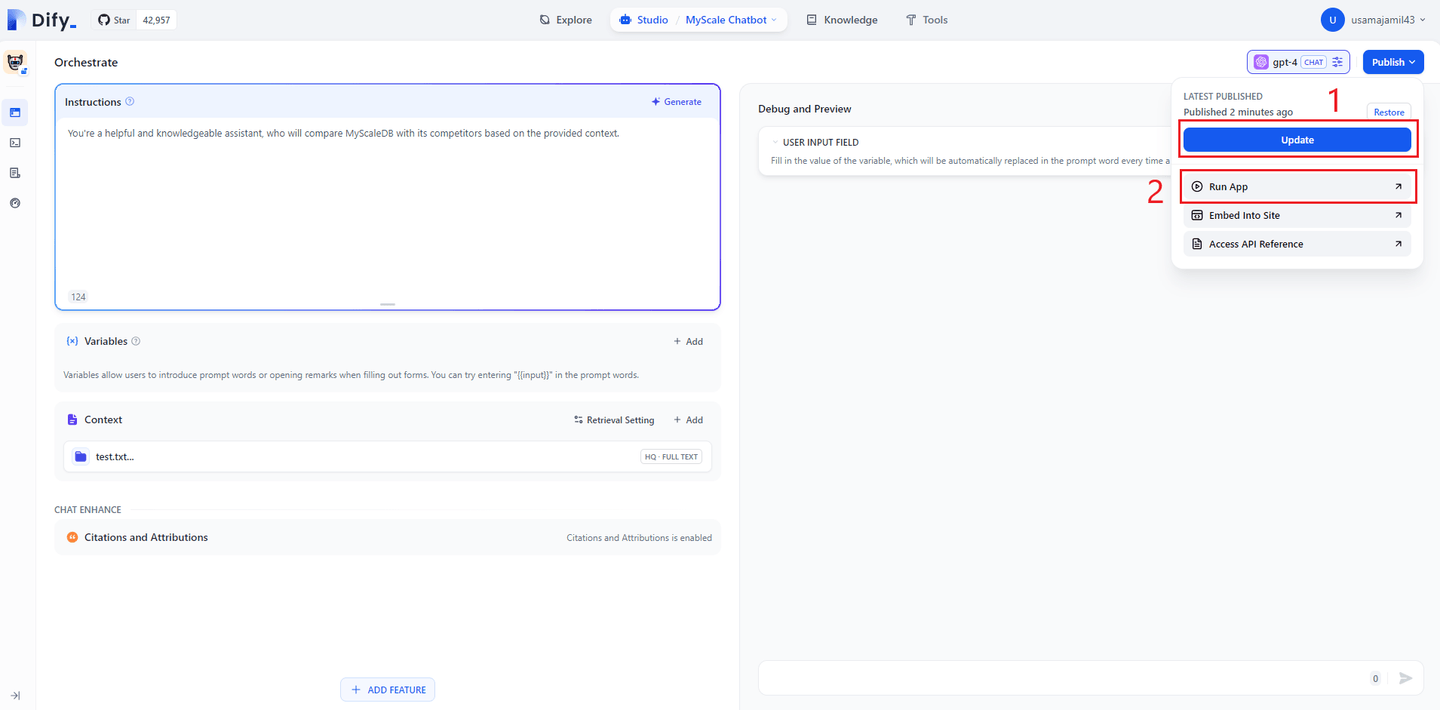
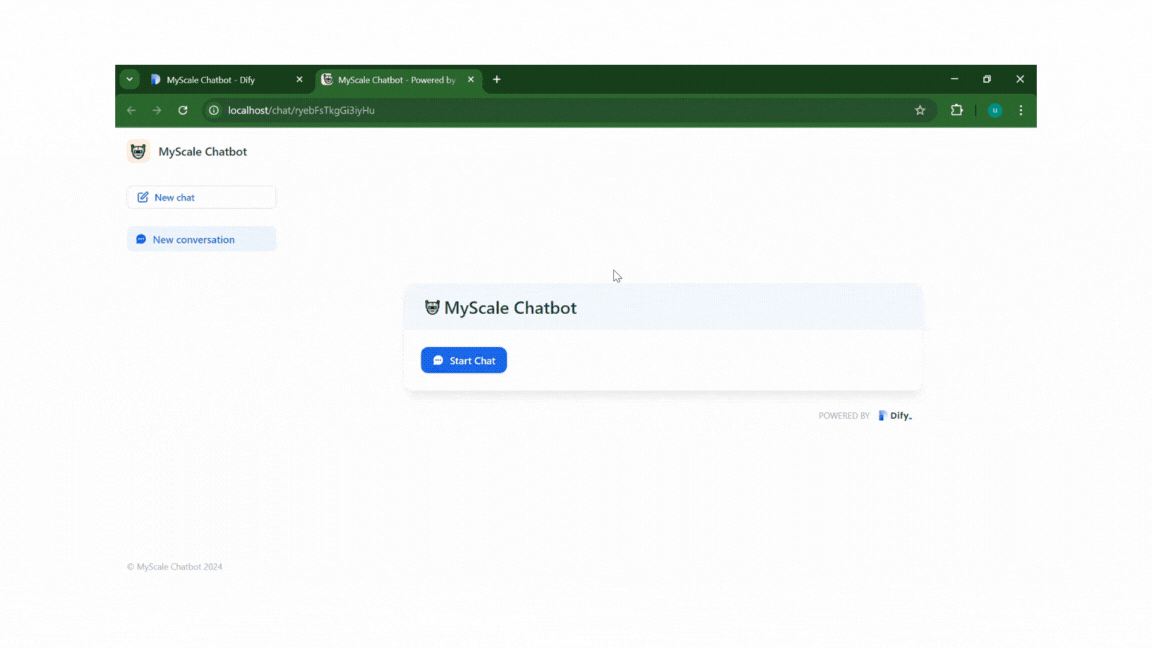
Simply click on the “Update button” to save all the changes you've made to your chatbot. After that, click on the 'Run App' button, and a new chat window will open.
Note: Once your chatbot is ready, Dify lets you easily embed it anywhere using iframes. Just select the “Embed into website” option and copy the iframe code. This allows you to integrate the chatbot seamlessly into your website or application.
Just hit 'Start Chat,' and you're all set to start using your chatbot.
To conclude, you've now built a chatbot using Dify and MyScaleDB, combining ease of use with powerful search capabilities. This setup gives you a solid foundation to create AI-driven applications that meet your needs. Now, you're ready to put your chatbot to work!

# Conclusion
Dify.AI (opens new window) is an advanced, open-source platform designed to make AI development accessible to everyone. It provides a comprehensive toolset, including visual prompt orchestration and easy integration options, allowing users to create powerful AI applications without needing extensive technical expertise. Dify focuses on removing traditional barriers to AI development, enabling quick and efficient deployment of complex AI solutions.
MyScaleDB, on the other hand, complements Dify as a reliable SQL-based vector database (opens new window) that handles large-scale data operations effectively. Its compatibility with SQL and powerful search features make it ideal for AI applications that require effective data management. MyScaleDB ensures that your AI solutions are both scalable and high-performing, working hand-in-hand with Dify's user-friendly tools.
In addition, MyScaleDB offers new users a free development tier for storing up to 5 million vectors (768d), making it an excellent option for those looking to explore and build AI applications without initial costs.
If you want to discuss more about building RAG/GenAI application, feel free to contact us through Twitter (opens new window) or Discord (opens new window).